How to Take Screenshot on Windows 10?
We take screenshots on PC for many reasons. A screenshot works as a piece of evidence for later reference, or it is the best way to gather information if a file or document doesn’t allow you to download. Screenshots can be taken across the devices, and capturing screenshots on a Windows PC is not a new task.
There are several ways to capture screenshots on Windows 10. You get some built-in features to do it. This post combines some methods to capture screenshots on a Windows PC. Keep reading this guide to learn different ways to take screenshots.
Consider the Print Screen or PrtScn button on the keyboard
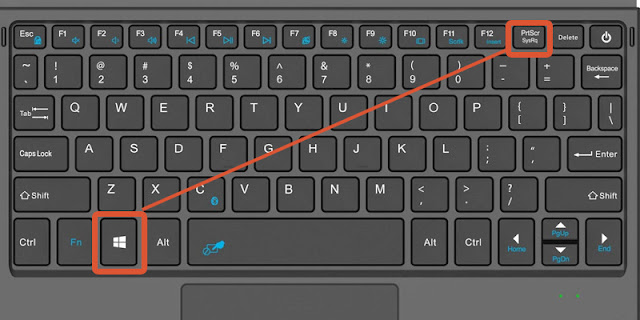
You can easily capture a screenshot through the PrtScn button available on the keyboard. You can see this button labeled as a different name like PrtScn, PrntScrn, Print Scr, etc. Most keyboards combine this button between F12 and Scroll Lock. To take screenshots using the Print Screen feature, you need to follow the below steps.
- Click the Print Screen button to create a copy file of the screen area.
- Then click the Windows key along with the PrtScn button to save the captured screenshot.
- Take advantage of the built-in Snipping Tool.
Use Snip & Sketch and Snipping Tool
Both Snip & Sketch and Snipping Tool are excellent ways to capture screenshots on a Windows PC. These are the built-in tools that come with a Windows computer. Snipping Tool was launched with Windows Vista by Microsoft. After all, you can still use these tools to take a screenshot. Let’s move ahead on the methods.
Use Snip & Sketch
- To use Snip & Sketch, search it in the menu search bar. Find it and launch the program.
- Now you will see a button in the top left corner in blue color. You have to click on it.
- In the drop-down menu, you will see three options like snip now, snip in 3 seconds, and snip in 10 seconds.
- Please choose the one action and take it to the area you want to capture.
- Now do free the mouse button and save the image.
Use Windows key+Shift+S if you directly want to access Snip & Sketch. Press these three keys at once, and you will get the program in no time.
Use the Snipping Tool
This tool almost works like Snip & Sketch as a message appears when you access it like “Snipping Tool will be moving to a new home.” The process of capturing screenshots will be the same.
- To take screenshots, you will have to choose the mode and the delay. Set a timer up to 5 seconds and proceed ahead.
- Hit the button New.
- Select the area to take a screenshot.
- Do free the mouse button and save the result.
Consider the Game Bar
The Game Bar is also a great alternative to capture screenshots. Game Bar can be accessed using the Windows+G key. As it opens, you can take the help of the following steps to take screenshots.
- Access the Game Bar by pressing Windows+G.
- Hit the screenshot icon from the capture tab.
- Press Windows+Alt+PrtSc to capture the full screen.
By following the above ways, you can capture screens on a Windows PC in no time. Read the full guide for detailed knowledge about how to take screenshots on Windows 10.
Source :- https://wgslogin.com/how-to-take-screenshot-on-windows-10/


Comments
Post a Comment